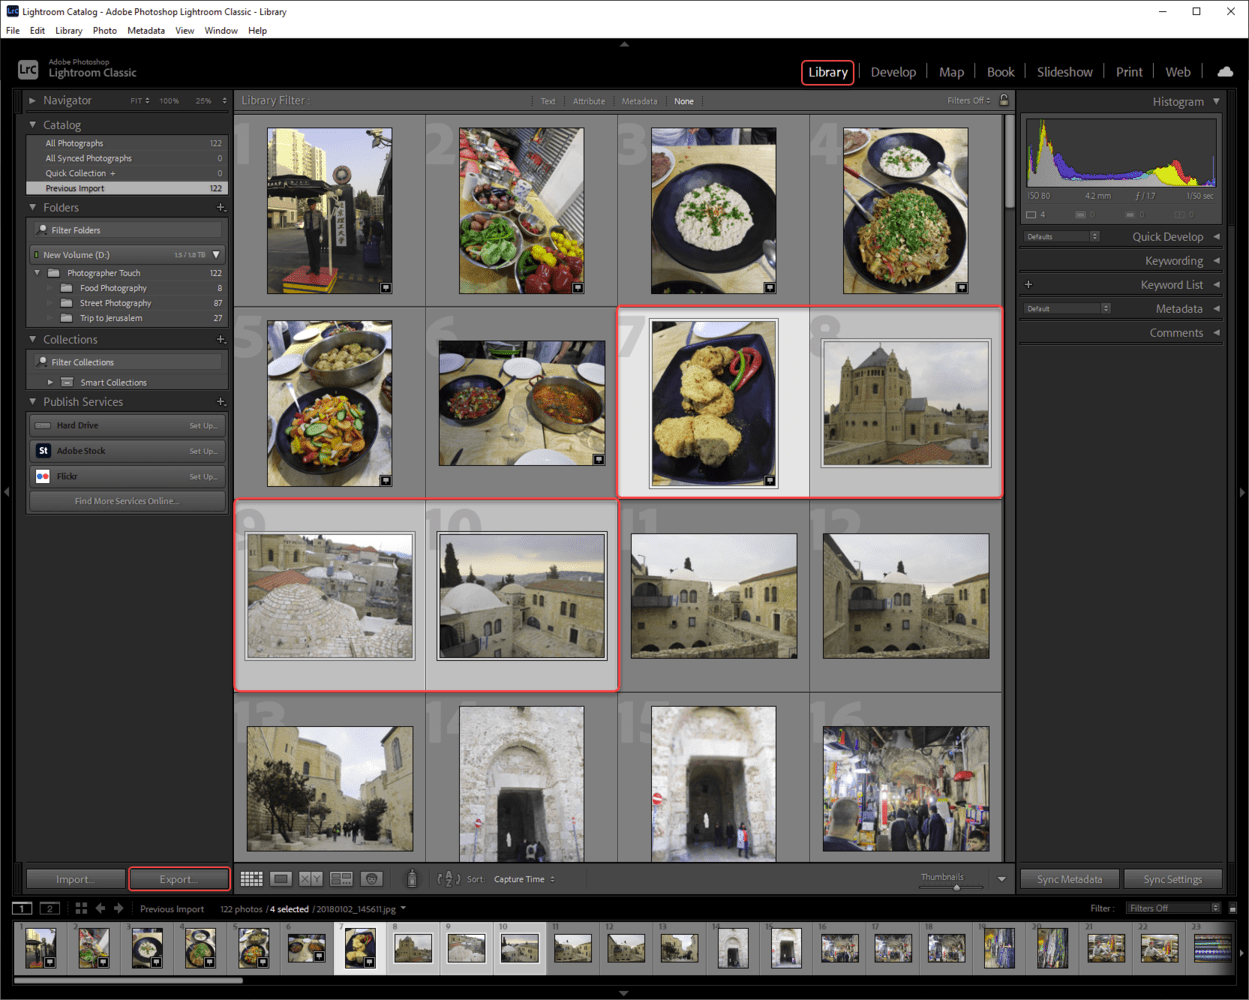
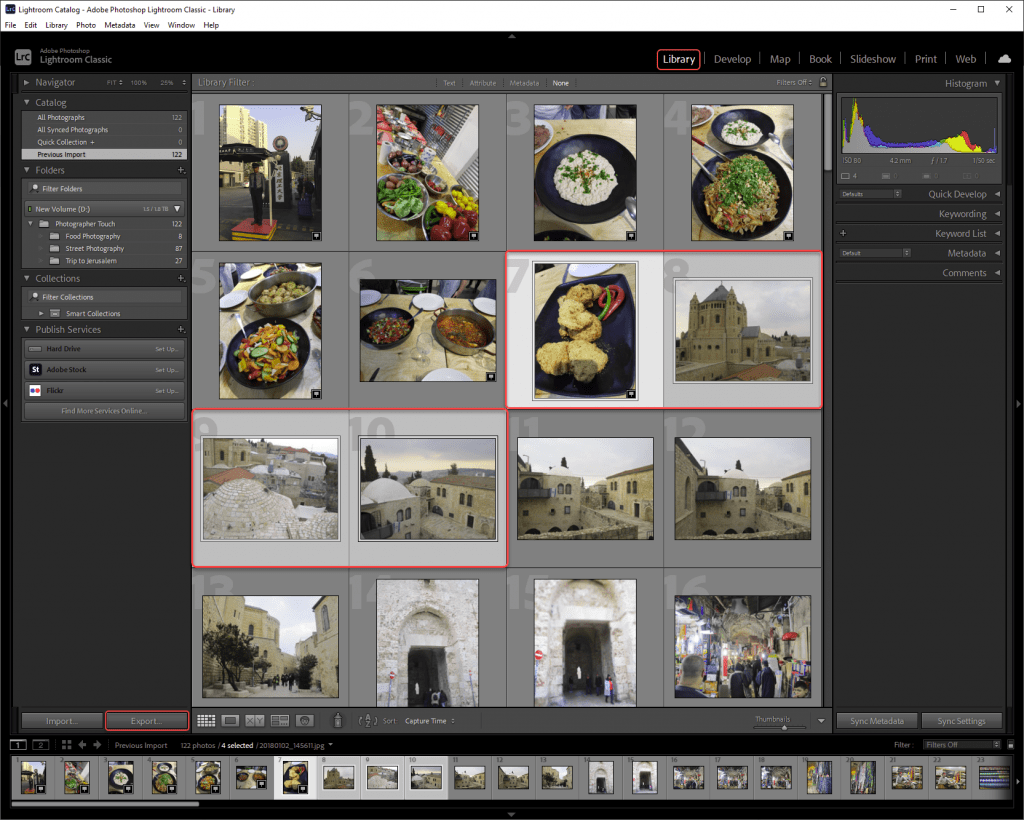
After you are done with the editing process. Now it’s time to export the photos from Lightroom. Choose the photo or photos that you want to export with the same settings, Right-click on your mouse, and pick Export > Export. Another way is: File > Export
Or, you can use the keyboard shortcut Ctrl+Shift+E.
Or, if you are in the Library section, you can use the Export Button on the bottom left.
Lightroom Export Settings
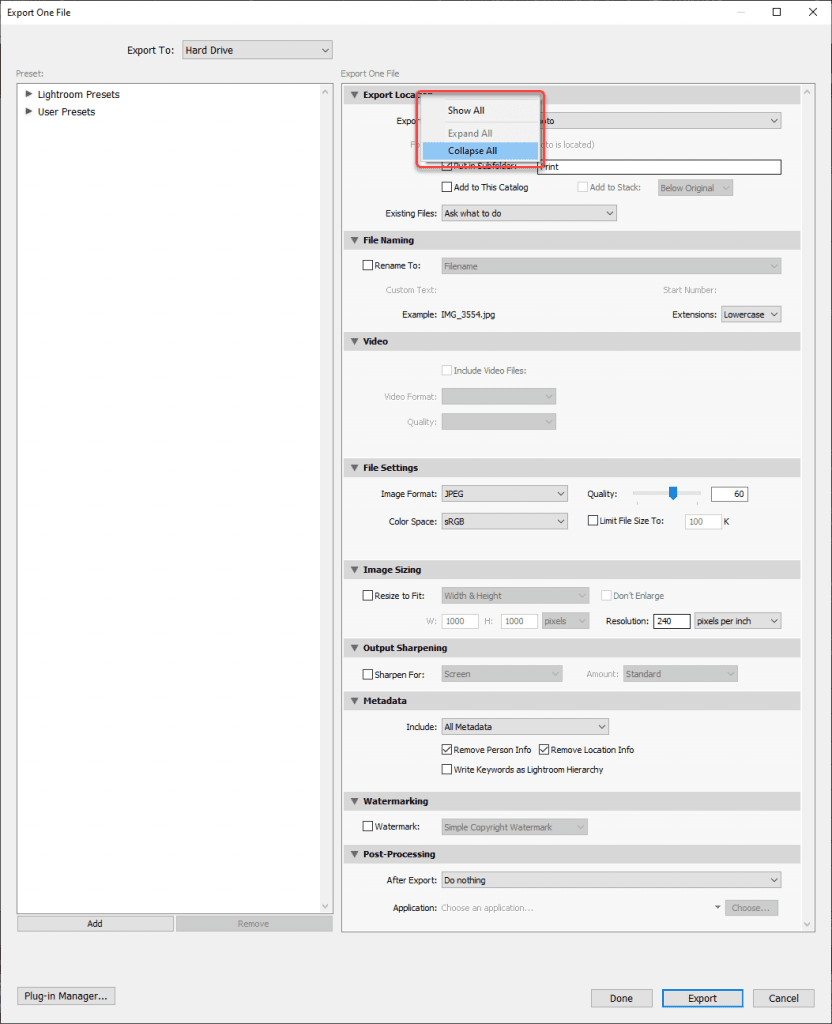
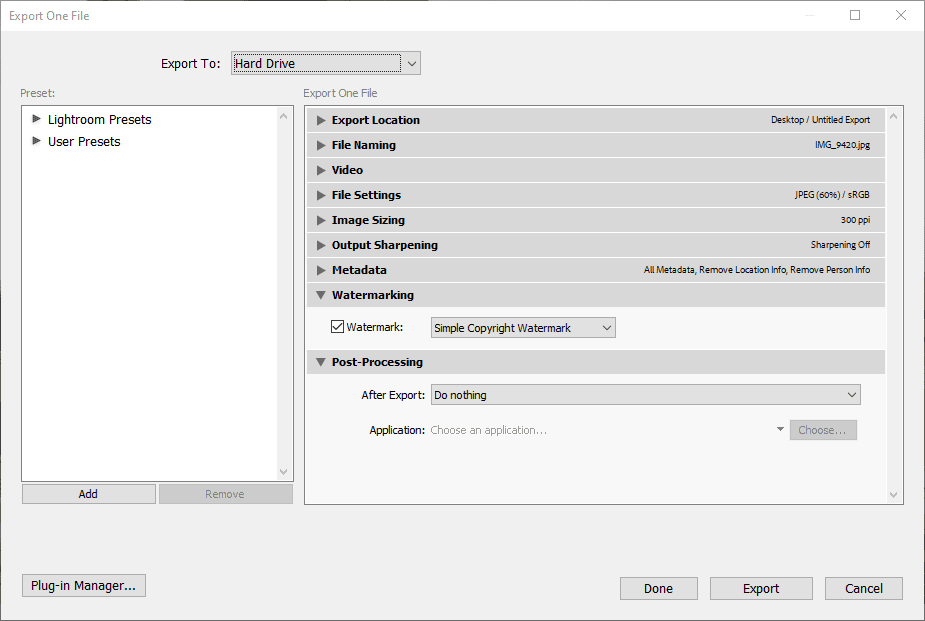
You will open the Export window. And you can see it is built from two sections, the left section is where the presets for quick export, and the right section is where all the settings and definitions are.
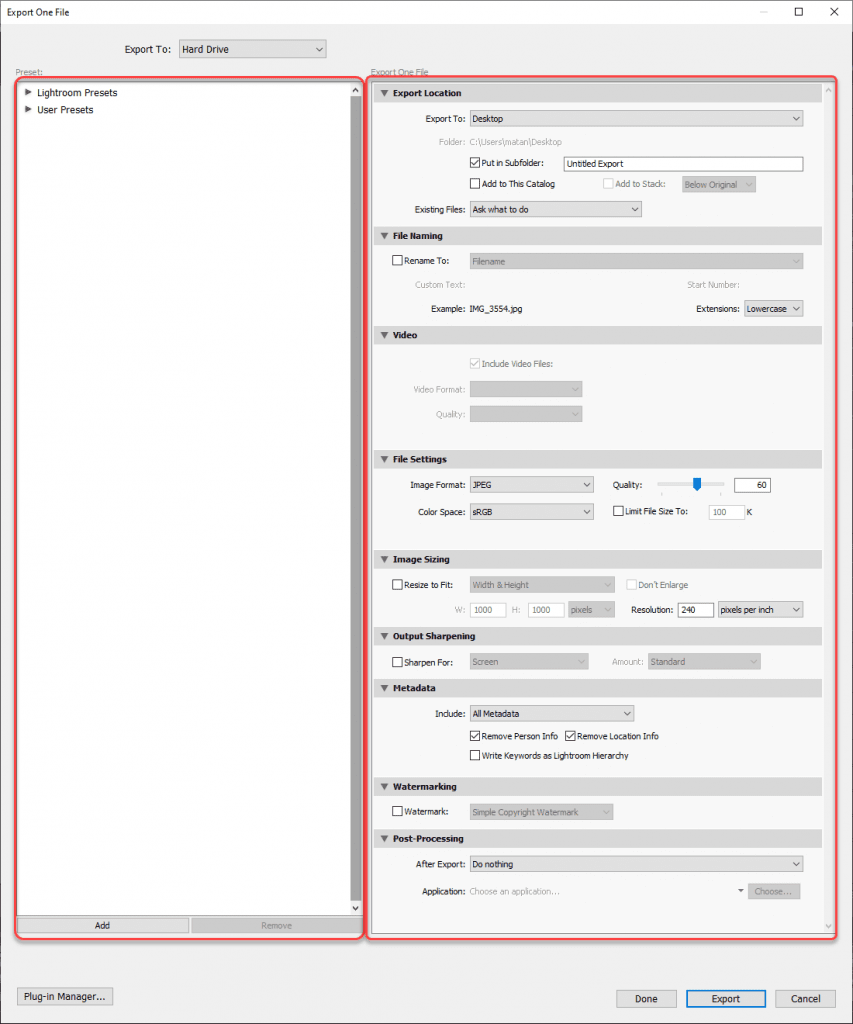
It can look overwhelming and scary but don’t worry, we’ll go over all the different sections.
Small Tip: Right-click on one of the sections and you will be able to choose between “Collapse All” and “Expand All” the sections if you want to ease your eyes.
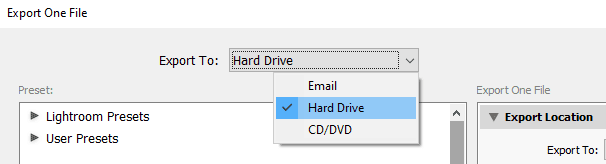
At the top, you have 3 options to choose where you want to export the photo to. Email, Hard Drive, and CD/DVD.
Usually, it will be the Hard Drive.
Export Location
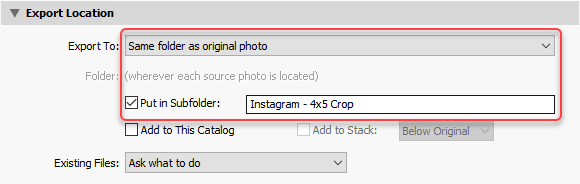
In the Export Location section, you can set the location you want Lightroom to export the photos. In the “Export To” you will set the specific folder, you want to save the photos.
You have a few options:
“Specific folder” – you can choose manually the specific location where you want the photos to be saved.
“Same folder as original photo” – Lightroom will export the photos to the same folder where the original photos are.
“Choose folder later” – Lightroom will allow you to choose a location every time you will export a photo.
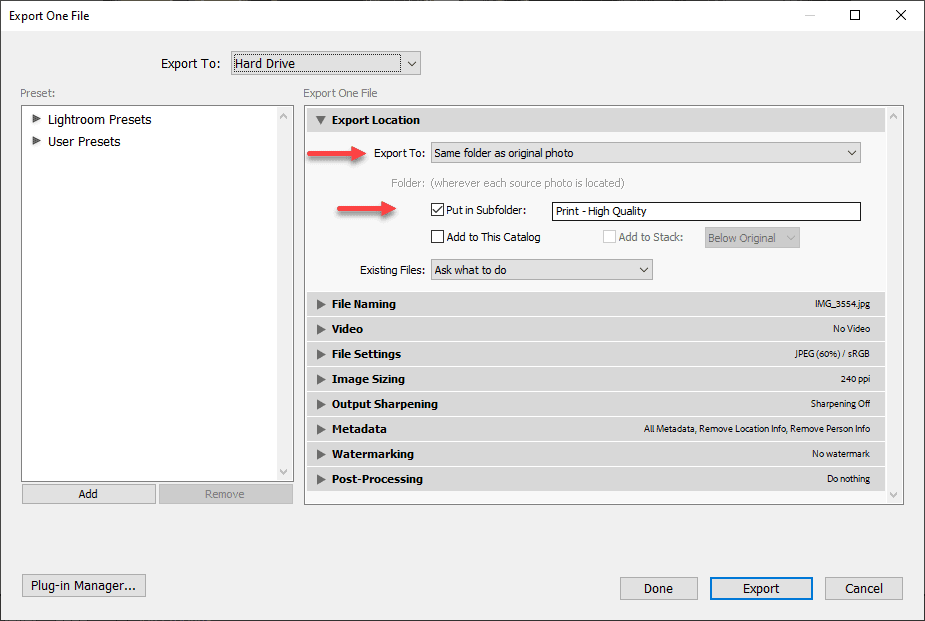
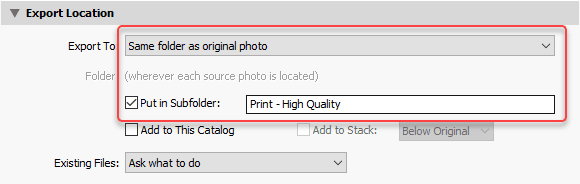
For a good and easy-to-use structure, it is recommended to separate the new files from the originals. Therefore, it is preferred to choose “Same folder as original photo”, and then, check the “Put in Subfolder” option, and define a descriptive name for it, for example; “Print – High Quality”, or “Web – Instagram”, or “Web – Facebook” Etc.
That way, the files won’t mix and you will be able to find the photo you want quickly and easily.
Note – if you want Lightroom to import the photo you are exporting back to the catalog, just check the option: “Add to This Catalog”
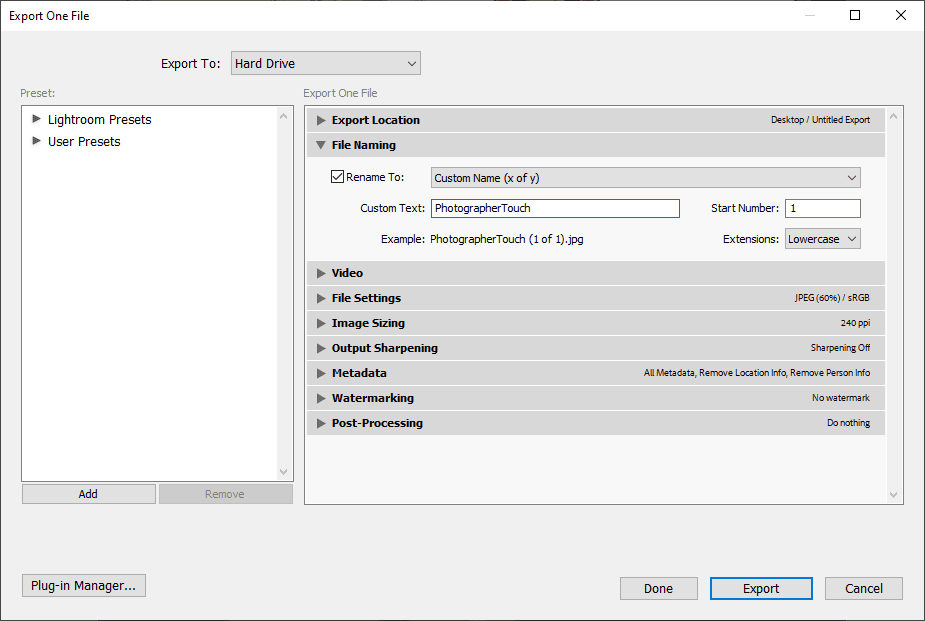
File Naming
In the File Naming section, you will be able to change the names of the files you are exporting. Lightroom gives you several templates to choose from, or you can choose the Edit option to make your own personal template.
BTW, the Video section will only be available if you chose to export a video.
File Setting
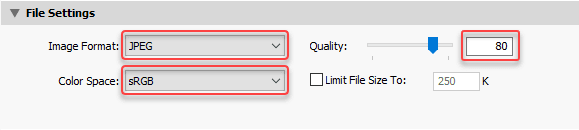
In the File Settings section, you can define the Image Format, Color Space, and Quality of the photo you want to export. And you can set a limit to the file size if you want to keep it small.
Image Format – select the JPEG (Joint Photographic Experts Group), this format is commonly used to display photographs and other continuous-tone images in web photo galleries, slide shows, presentations, and other online services. And in the Best Quality setting, the result is indistinguishable from the original.
Color Space – select sRGB as its more common color space, and better and more consistent results than the Adobe RGB (1998) or the Pro Photo RGB for the web.
Quality – here you can define the final quality of your file, the higher the quality, the bigger the file will be. When exporting for the web, a quality of 80 will give way you a good ratio of quality to file size.
If you want to limit the file size, you can check the Limit File Size To and define your preference.
And if you want that someone else will continue to work on your file, you can export them as an open format like; PSD (photoshop file). In that case, you will have a different setting to define, depends on the file format that you choose, like; TIFF, PSD, or DNG.
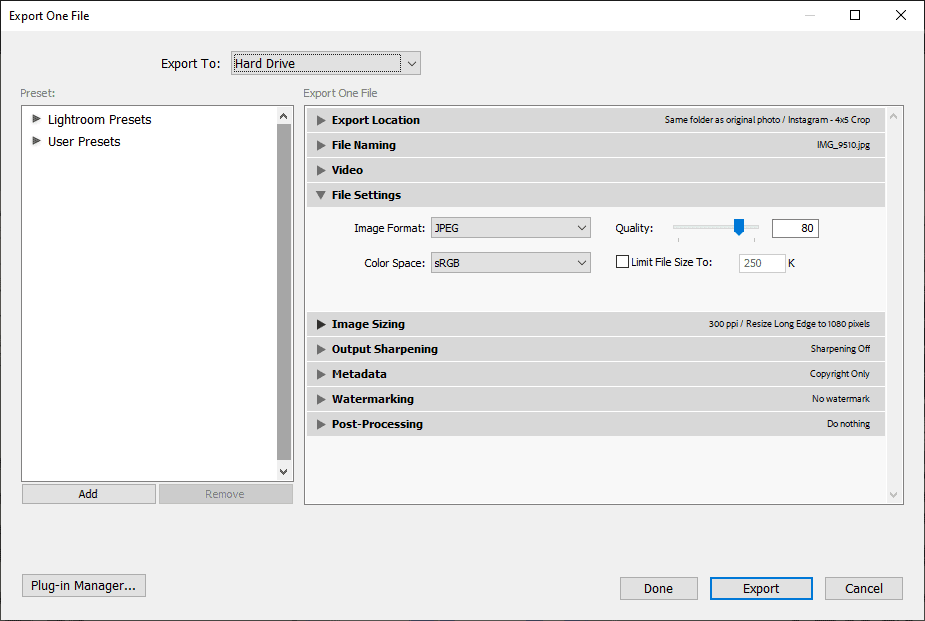
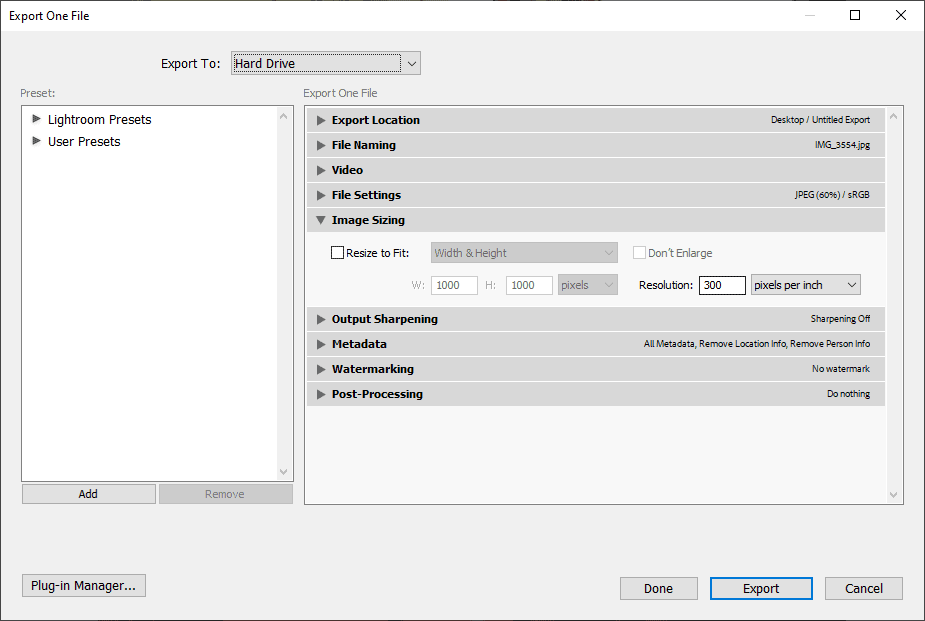
Image Sizing
In the Image Sizing section, you can set the height & length of your photos, and the pixel resolution (by pixels per inch, or pixels per cm). By default, it is recommended to export your photos at their full length and size. But if you need to export your photos in a smaller size, then you can check the Resize to fit and adjust the appropriate size by; Width & Height, Dimensions, Long Edge, Short Edge, Megapixels, and Percentage.
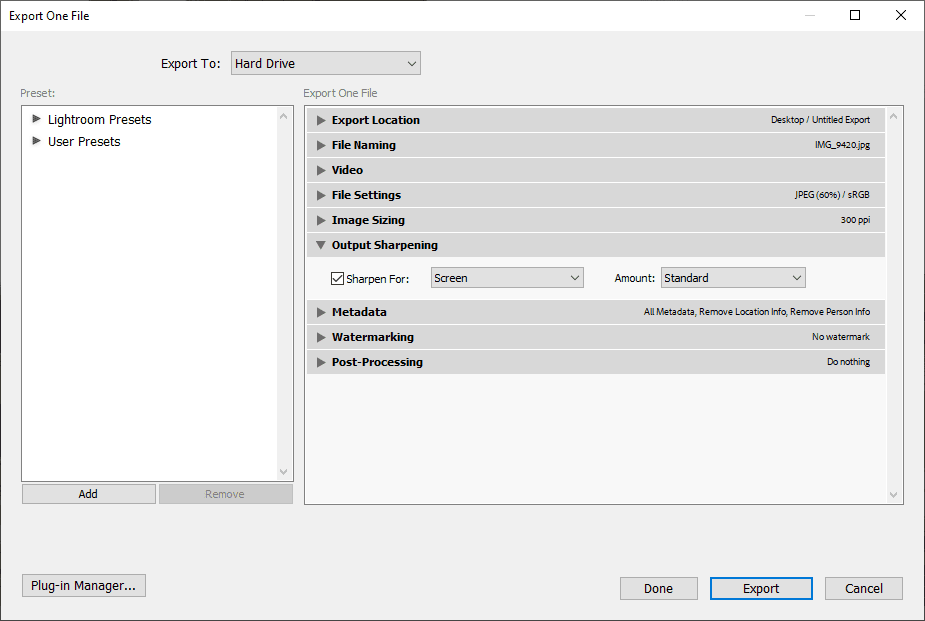
Output Sharpening
After you set the image size and pixels, you can sharpen the photo by checking the Sharpen For in the Output Sharpening section and choose the right option, if it is Screen, Matte Paper, or Glossy Paper. Then you choose the Amount.
Note: Lightroom offers 3 levels, Standard, Low, or High Amount. To know what is the right Amount for your photo, it is recommended to export the same file 3 times, but change the Amount to be different each time, and then decide which one works better for you.
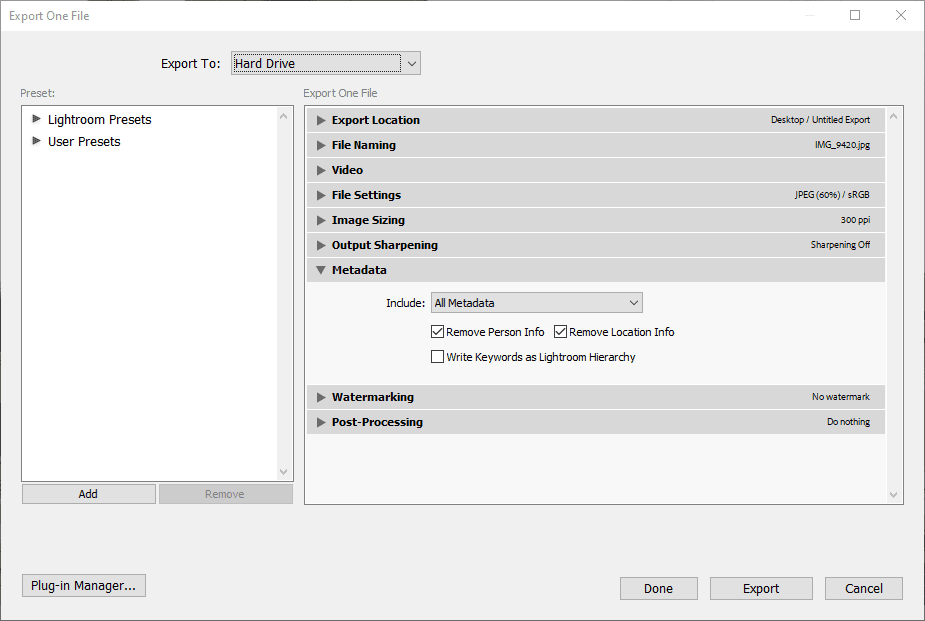
Metadata
In the Metadata section, you can choose the data you want to include, and if you want to remove Person Info, and Location Info by checking the boxes (If your initial choice didn’t exclude them already).
Watermarking
In the Watermarking section, you can add a watermark signature to your photos. You can choose between Lightroom default signature, or making your own custom signature.
In the last section, the Post-Processing, you can set what will happen after Lightroom finishes exporting the files. The default is “Do nothing”, but you have options; Show in Explorer, Open in Adobe Photoshop, or Open in Other Application.
After you finish setting up all the definitions, hit that Export button.
How to Set Lightroom Export Presets
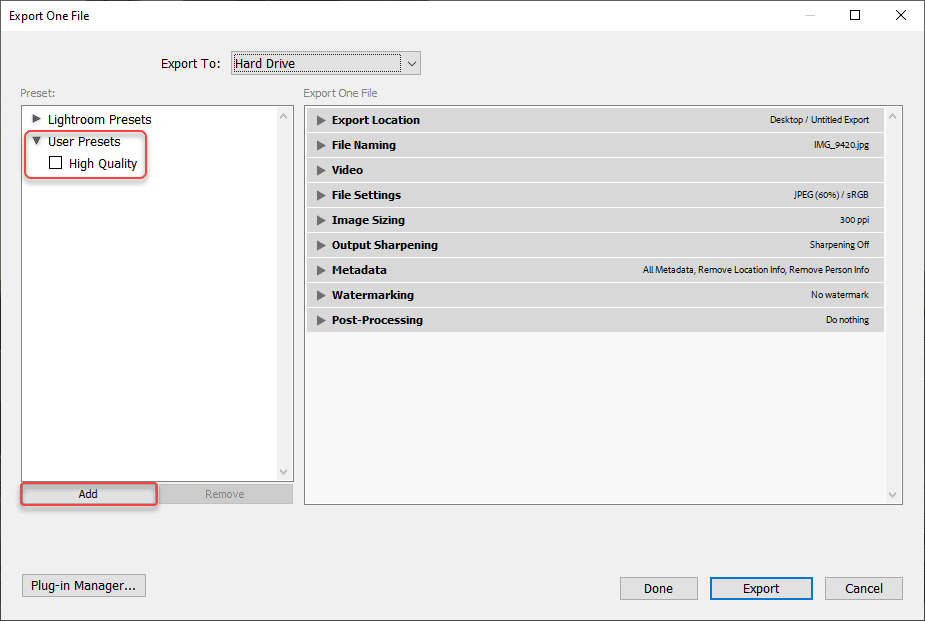
After you finished setting all the different definitions in all the sections, you can save it as a preset for future usage, by pressing the Add button on the left section. You will be able to use these settings to export photos with one click.
After you pressed the Add button, choose a “descriptive” name (like “High Quality”), and press Create. Now, the new preset will appear on the left section of the export window.
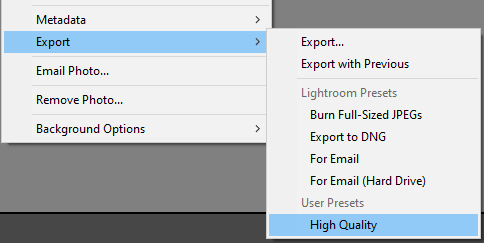
Another option is, right-click on your mouse, and pick Export, and you will have your custom presets to choose from.
The Best Lightroom Export Settings
After we finish reviewing the Lightroom export setting window, and to adjust your photos to perform the best in the different platforms, there are a few things to notice.
So let’s go over the best Lightroom export settings for the main uses in the day-to-day.
Export As a Catalog
Exporting your photos as a catalog can become handy when you have a big catalog and you want to separate just a group of photos for a specific project.
This is actually quite simple, all you need to do is:
- Choose the photos you want to export as a catalog.
- Go to File > Export As Catalog.
- Choose the name and location for the catalog.
- Indicate whether you want to export the negative files (the original files that were imported into Lightroom Classic) and previews, and then click Save (Windows) or Export Catalog (Mac OS).
The new catalog contains links to the selected photos and their information. You must open the new catalog to view it.
Best Lightroom Export Settings For Print
If you want to print your photos, you will want to set your export setting to be defined as high resolution.
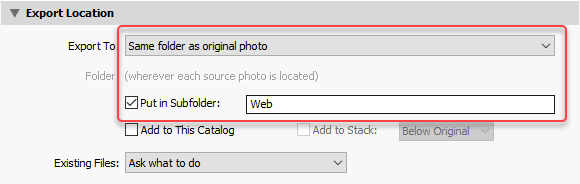
As mentioned above, it’s important to keep your folders in order if you want to easily find your photos in the future. So, a good idea is to keep the photos in the same folder as the original photos. But, put them in a subfolder, and be sure to give it a meaningful name (for this example; Print – High Quality)
- Choose the location of where you want to export your photos.

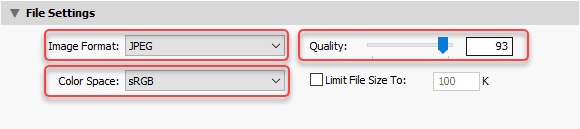
- Now, set the Image Format to JPEG, and the Color Space to sRGB and Limit File Size should not be checked.
The image quality can be a bit tricky, because, when you export a photo for print, you want it to be at the highest quality. So you can choose the quality to be between 93 and 100, but unless you are printing a poster size, you can choose a lower quality of 77 to 84, it will save you about 40% less in the file size, and most likely you won’t see the difference. (the quality level in between is 85 to 92, and it saves around 20% on the file size).
You can check to see which one works better for you.
- Next, set the Resolution to 300 pixels per inch (ppi) to get your high-resolution photo, and make sure the Resize to fit is uncheck.

- Check the Sharpen For ‘glossy’ or ‘matte’ depending on your type or preferences.

- Usually, you will not check the Watermark when you are printing a photo. Unless you need it for some specific reason.

- Hit that Export button.


Best Lightroom Export Settings For Web
When exporting your photos for the web, it can be your own blog or site, or whether it’s your own online photography portfolio the emphasis goes on a smaller file size file and, depends on where the image is going to be located, you may need to resize the image dimensions, or in some cases crop it to fit a specific place with specific dimensions.
Keep in mind that your can export your photos in a good resolution, as long as you keep on lower file size, in order for the webpage will be able to load fast.
- In the Export Location section, Choose the location of where you want to export your photos, and again, be sure to give it a meaningful name (for this example; Web).
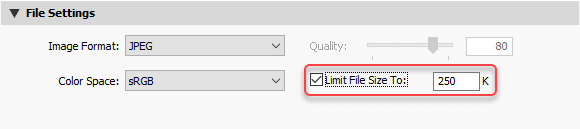
- In the File Settings section, set Image Format to JPEG, and the Color Space to sRGB.
The recommended file size for photos on websites is around 250k. Check the “Limit File Size To:” and set the value to be 250 to ensure that Lightroom will export your photo in the right size.
Note: the Quality is irrelevant (and will become gray) when you will check the Limit File Size To. - In the Image Sizing section, here you will check the Resize to Fit, to set the values for Lightroom to limit the image size according to the specific place you want to put it on your site.

Note: it won’t matter if you set the Resolution at 300 pixels per inch (ppi), or 72 pixels per inch (ppi), will not affect your file size because you are resizing the photo by pixels. - Choose Sharpen For: screen
- If you want you can add a watermark to your photo and then hit the Export button.


Best Lightroom Export Settings For Facebook
Facebook is automatically resizing and format your photos when you upload them to Facebook. But they are giving us some important tips to make sure the photos will appear in the highest possible quality.
- Resize your photo to one of the following supported sizes:
- Regular photos: 2048px wide or smaller
- Cover photos: 851px by 315px
- Save your image as a JPEG with an sRGB color profile.
Note, for Facebook Thumbnail, the recommendation is for minimum size: 200x200px, ideal ratio 1.91:1, 8Mb max. (eg: 1640x856px or 3280x1712px for retina screens).
When exporting photos for FB feed, there is no mandatory requirement for a specific ratio.
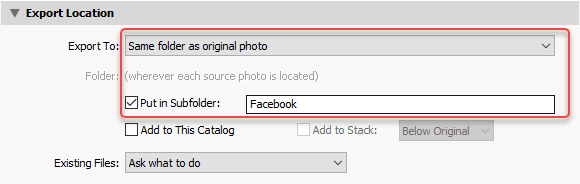
- In the Export Location section, Choose the location of where you want to export your photos, and again, be sure to give it a meaningful name (for this example; Facebook).
- In the File Settings section, set Image Format to JPEG, and the Color Space to sRGB. The weight of the file is affected by the quality level. You can set the Quality at 80 or 70, the result will be good enough. Note that with a quality of 70, your file size will be lower.

- In the Image Sizing section, here you will check the Resize to Fit, and set it to Long Edge, and as to Facebook recommendations, set the pixels at 2048.
- Choose Sharpen For: screen
- If you want you can add a watermark to your photo and then hit the Export button.


Best Lightroom Export Settings For Instagram
When you share a photo on Instagram, Instagram will upload it at the best quality resolution possible (up to a width of 1080 pixels).
Instagram will keep the photo’s original resolution as long as the photo’s aspect ratio is between 1.91:1 and 4:5 (a height between 566 and 1350 pixels with a width of 1080 pixels).
So, it’s highly recommended to crop the photo in advance using Lightroom or Photoshop to make sure that all the important things are sitting correctly in the frame.
And for that reason, it’s also important to separate and naming it with a meaningful name, to keep track of all the different sizing.
Remember;
- Instagram posts can be square, landscape, or vertical.
- When watching the Instagram feed, the big photos will be with an aspect ratio of 4:5 (1080px by 1350px).
- But, When you are watching in an Instagram user profile, the photos are presented as a square with an aspect ratio of 1:1.
- For landscape posts, you will use an aspect ratio of 1.91:1, and the image will be 1080px by 566px.
Let’s dive into Lightroom export settings for Instagram.
- In the Export Location section, Choose the location of where you want to export your photos, and again, be sure to give it a meaningful name (for this example; Instagram: 4:5 Crop).
- In the File Settings section, set Image Format to JPEG, and the Color Space to sRGB. The weight of the file is affected by the quality level. You can set the Quality at 80, the result will be good enough, with lower file size.
- In the Image Sizing section, here you will check the Resize to Fit, and set it to be up to a width of 1080 pixels. That means, you either set the Long Edge or the short Edge to be 1080 pixels, depends on the photo’s dimensions.
- Choose Sharpen For: screen
- If you want you can add a watermark to your photo and then hit the Export button.

After you exported your photos to your computer. To upload them to Instagram, you can either send them by email to yourself and upload them from your phone. Or, you can install Dropbox on your computer, and from there you can upload the photos directly to Instagram.
Final note, I truly recommend that you save presets for all the different settings. It will save you a lot of time (and you won’t have to search for that guide all the time).

