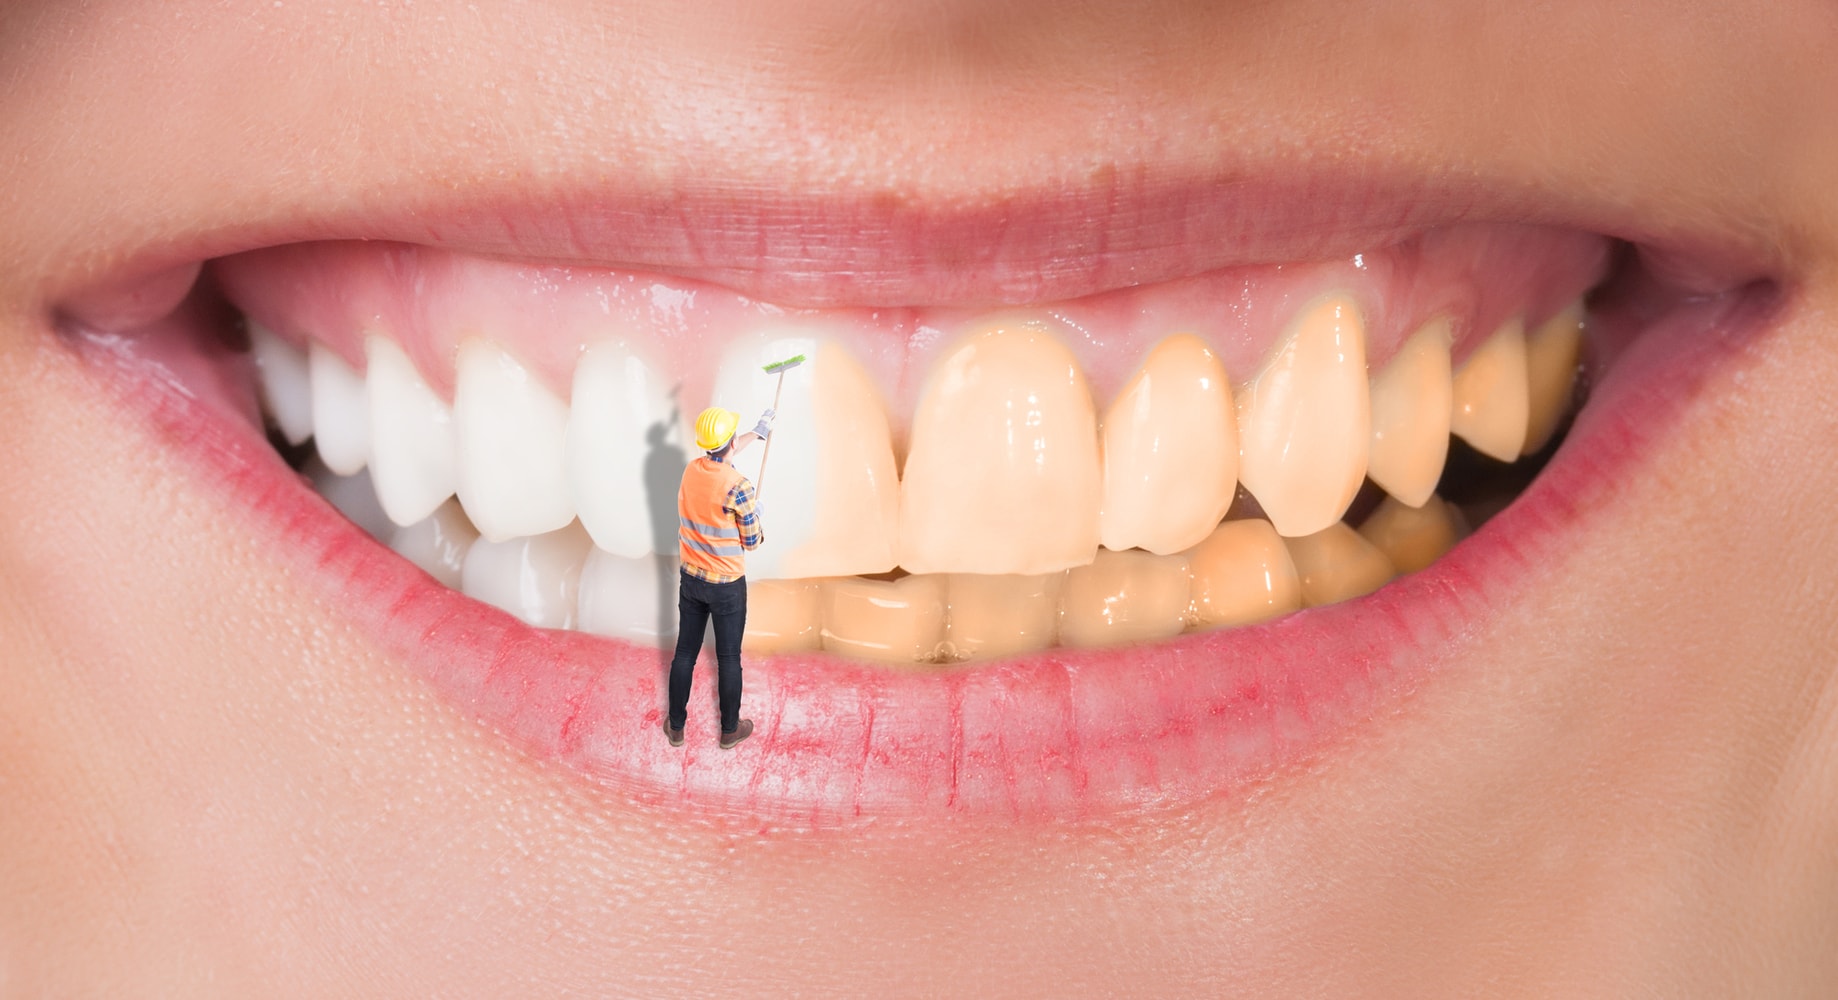
Teeth whitening is one of the basic editing skills that every photographer should know. If you shoot people it is essential.
Whilst teeth are not completely white, they can very often appear dull and off-color in photos. Brightening and whitening your subject’s teeth adds life and definition to your images.
This edit is widely used in portrait photography. You will also find it invaluable for headshots, weddings or events, and lifestyle images.
Lightroom Classic has all the tools you need to get the job done. Here we take you through in detail how to whiten teeth using Lightroom Classic.
Let’s get going.
Complete basic adjustments in the Develop Module
Before you start the teeth whitening, complete some initial global adjustments.
Make sure you are in the Develop Module. Press D or select Develop from the tabs along the top. Use the Basic Panel to correct the exposure, color temperature, and tones in your photo.
You can also complete other adjustments, including sharpening, noise reduction, and lens corrections. The closer you have your image to the final look you want, the easier it will be to edit the teeth effectively.
Related: How to Use Lightroom – Introduction for Beginners
Make Local Area Adjustments
Now it is time to begin detailed editing of the teeth.
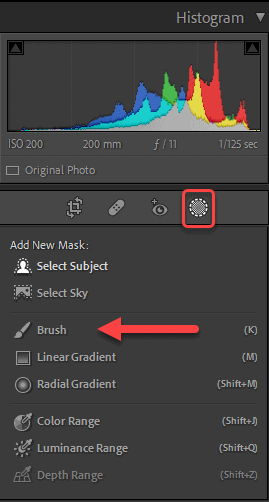
To whiten and brighten teeth you need to contain your editing to very specific parts of the image. This is where Lightroom’s Adjustment Brush comes in.
The Adjustment Brush is located in the tool strip underneath the Histogram, at the right of the interface (Masking). Click on the icon at the right. It looks like a circle with dots around the tip. It will open a panel where you will see the Brush.
You can also press K on your keyboard (it will create a New Mask automatically).
There are now two options. You can use the Lightroom Preset called Teeth Whitening, or use a regular Adjustment Brush with your own settings.
How to use Lightroom’s Teeth Whitening Preset
It is not immediately obvious where to find this tool preset.
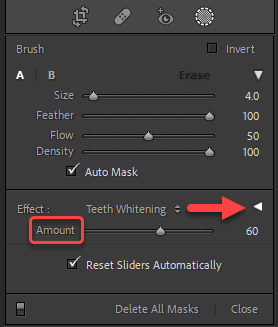
Select the Effect preset in the Adjustment Brush Panel. By default it will say Custom, and you will see two little arrows to the right of this. Click on it and a long list of options in a drop-down menu appears. You may find it initially says another other name from the drop-down list.
Near the bottom you will find Teeth Whitening.
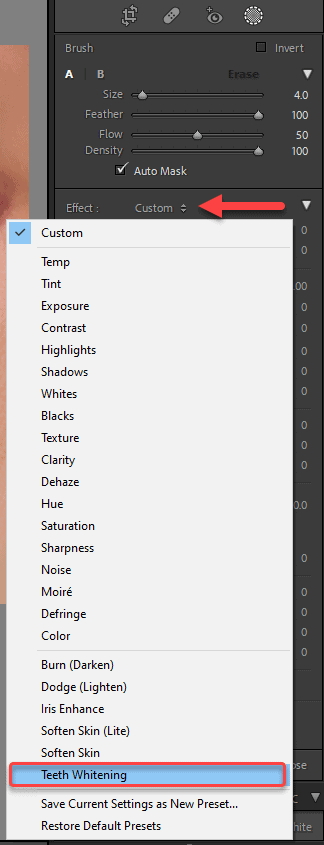
When you select Teeth Whitening Lightroom will load the appropriate slider settings. The default settings for teeth whitening include an increase in exposure, and decrease in saturation.
The Adjustment Brush Panel has two view options. Show or hide the full range of adjustment sliders by clicking on the small triangle arrow at the top right of the panel.
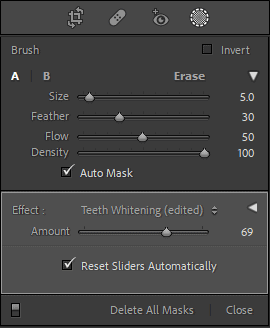
When the panel is closed, only a single slider called Amount is visible. Use this slider to control the overall intensity of the adjustment.
Whether the panel details are open or closed, you will find the Brush section at the bottom.
Select your brush settings
There are no absolute rules for this. It will be different for every photo. There is also an element of experience and personal preference which comes into play. You will start to get a feel for what works.
Here is a guide to get you started. But, don’t limit yourself to only these settings.
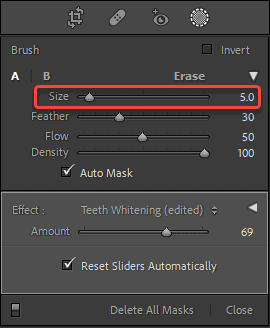
Make sure you have zoomed in on the teeth area in your photo. Use Cmd/Ctrl +, or select from the zoom presets, the This will help you pick the right settings.
Hover your mouse over or move the Size or Feather sliders and Lightroom shows you the cursor in the work space nearby.
There are two circles around the cursor centre. This inner circle shows the brush size and outer circle the feather size.
Brush Size: Choose a brush size that is roughly the same size as one tooth. Do not go any larger. You can also use a smaller brush.
A smaller brush size will give you more control over fine details. It will take a little longer to complete the edit. But, often you will achieve a better result.
You can also use the square brackets—[ and ]—to adjust the brush size up and down.
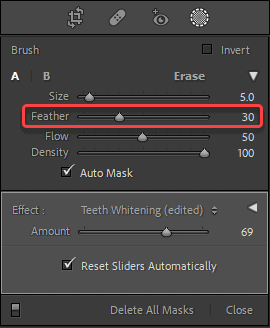
Feather: Use this to control how soft the edge of the brush is. For teeth whitening it will look more natural if the feather is reduced.
Set the feather to around 30 or less. This is a good starting point.
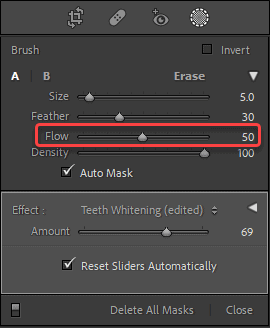
Flow: This sets the opacity of the brush. For more control, set this to around 50.
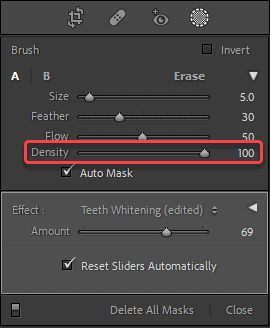
Density: This will set the maximum opacity of the brush. It can generally be left at 100.
Auto-mask: This setting limits your brush strokes to only areas with a similar color. At times this is extremely effective to paint around very well defined areas. It prevents bleeding into contrasting nearby elements.
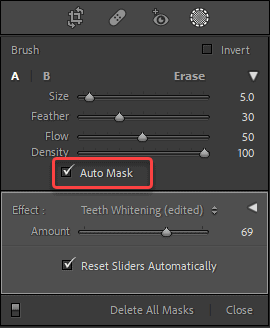
Yet, it can also create a harsh edge that looks unnatural.
In most cases, for teeth whitening, it is better to leave Auto-Mask unchecked. But you can experiment and see what works for your images.
Paint the adjustment onto the teeth
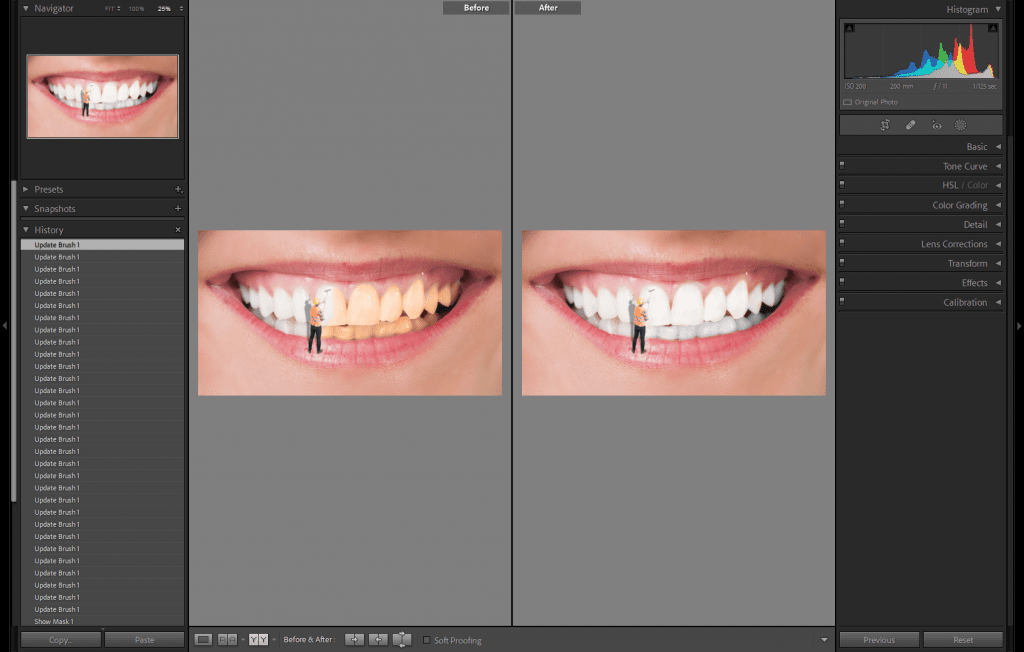
When you have chosen the appropriate brush settings, start painting over the image. Be careful to paint only on the teeth areas where you want to apply the whitening.
You will see a grey pin is placed at the point where you begin painting.
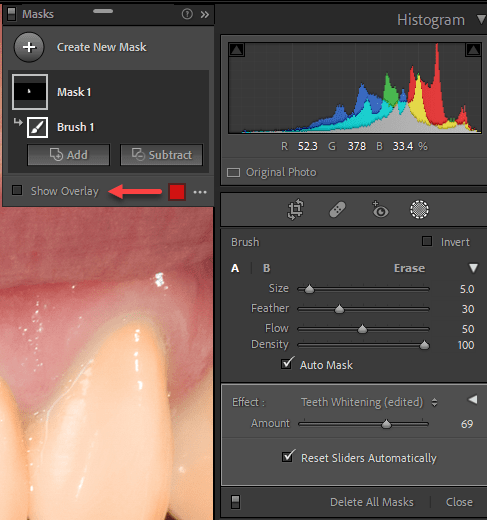
By default a red overlay on the image will show you where you have painted. To turn this overlay on and off, press O. You can also use the tick box underneath the main work area.
Paint and stop as many times as you wish, and each stoke is added to the initial pin. Every area you paint over that is attached to that pin will have the same adjustments applied.
You can also use an Eraser Brush if necessary. Click on Erase at the top of the Brush section of the Adjustment Brush Panel. Now when you brush on the image it will remove areas from the pin.
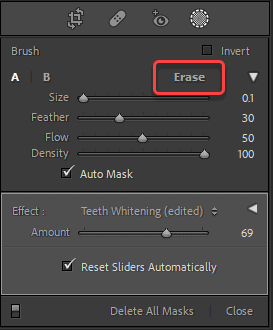
The Eraser is perfect to soften any areas where the effect has been applied too heavily. Reduce the Flow of the Easer, and paint over the relevant areas.
How to add a new Adjustment area
Often a photo will need more than one local area adjustment. You can then apply different changes to each area.
On your Mask panel, Create New Mask
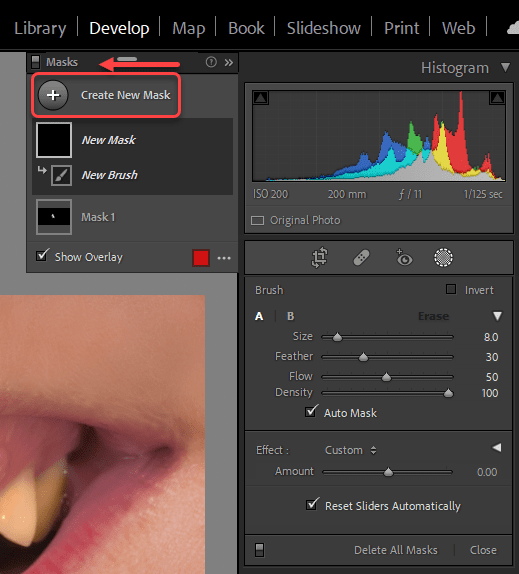
(If you have an older version of Lightroom, you will have at the top right of the Adjustment Brush panel there are two options—New and Edit. Click on New. Now when you paint over the image a new pin will be created.)
If you need to reset all the brush sliders, click the Delete All Masks, at the bottom of the Brush Panel.
Editing your Adjustments
After you have painted the adjustment on, you may find it needs some tweaking.
You can come back and edit your adjustments as many times as needed. Return to the Adjustment Brush tool, then select any pin you wish to edit. Move the sliders to increase or change the effect as required.
When selected, a pin has a black dot in the middle of the grey pin. You will also see the mask overlay, if that is set to show.
If your pins are not visible, hover the mouse over the image. Pressing H on your keyboard will also show and hide your pins. You can control the pin visibility settings under the main work area.
Working without the Teeth Whitening Preset
The teeth whitening preset often works well. But, it is not going to be right for every image.
You can also use the Adjustment Brush sliders to make the exact adjustments your image needs. Generally, teeth require some lightening and color correction.
Here are some basic settings you can use:
1. Increase exposure or use tone sliders (on the Basic panel) to brighten the teeth
2. Reduce Contrast a little. Try around -30
3. Lighten the shadows. This is useful to soften harsh dark lines between teeth
4. Change the color temperature. Reduce the yellow tones to create a more neutral tooth color
You can also experiment with applying some desaturation.
Save your own Brush Preset
When you have created a combination that works for your images, go ahead and save that as a new preset.
Open the Effect preset drop-down menu at the top of the panel. Scroll all the way to the bottom section and select Save Current Settings as New Preset.
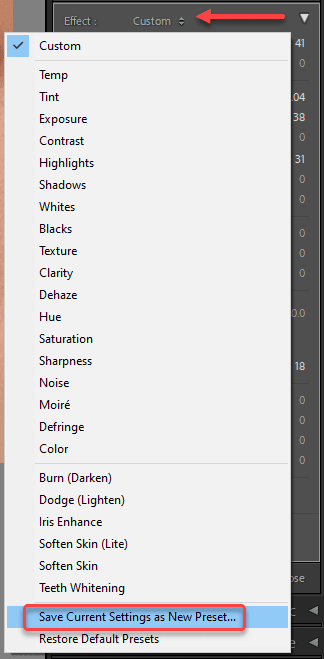
In the dialog box, give it a name that will help you identify it later. Press Create to save it.
If you click on the Menu again, you will now see options to rename or delete your preset.
Related:
How to Import Photos Into Lightroom Classic
How to Export Photos From Lightroom Classic
Some tips to get great teeth whitening results
1. Don’t overdo it
Avoid making the teeth too bright. Err on the side of subtle.
Think about the subject and the overall editing style. Ensure the teeth aren’t grabbing too much attention and overpowering the photo.
2. Don’t make the teeth appear to glow
This can happen when the brush feather is set too high, and the effect spreads out to the surrounding gums or lip area. Or, when it is applied much brighter in the center of the teeth. Work with a smaller brush and less feather for a better result, and use the eraser brush to clean up the edges.
3. Don’t make all teeth the same brightness
Often the front teeth get more light than those towards the side. Make sure you do not lose these subtle differences in tone. This helps keep your edit looking as natural as possible.
That covers how to whiten teeth using Lightroom Classic. You should now feel confident to begin editing your own photos. A bit of practice and you will get the hang of it quickly.
If you are not in the habit of doing detailed editing on your images, you will be impressed by how much difference this subtle edit can make.
Teeth Whitening adds a very satisfying finishing touch to a photo.

