One key strength of Lightroom is that it uses non-destructive editing. All the adjustments you make to your images are stored as a list of changes.
So, it is pretty easy for Lightroom to let you turn those changes on and off.
Yet Lightroom also has a few different ways you can do this. There are also a few tricks and extra features which let you see the before and after of different edits.
Let’s take a look at all the ways you can compare Before and After views in Lightroom Classic.
Why you should use Before/After in Lightroom
The goal of post-processing is to get the most out of your images. You want to get the color and mood right, plus improve the composition.
Regularly comparing your edited image with where you started keeps your editing on track. Check you have not taken anything too far. Or, made something look too unnatural.
Get in the habit of viewing Before and After every few minutes during your editing process.
Related Articles:
How to Use Lightroom (an intro to Lightroom)
How to Import Photos Into Lightroom Classic
How to Export Photos From Lightroom
How To Batch Edit In Lightroom Classic
How To Use Color Grading In Lightroom Classic
Dodge and Burn in Lightroom
How to Blur Background in Lightroom
How To Use Masking in Lightroom
How To Zoom In Lightroom
The basics of viewing Before/After
Before and After only works in the Develop module. Click on the Develop tab at the top of the interface, or press D.

The Before image you see will be how the image was when imported into Lightroom. It includes any Presets you applied during import.
Adjustments made with the Crop and Straighten tool are not removed when the Before image is displayed.
Before/After keyboard shortcut
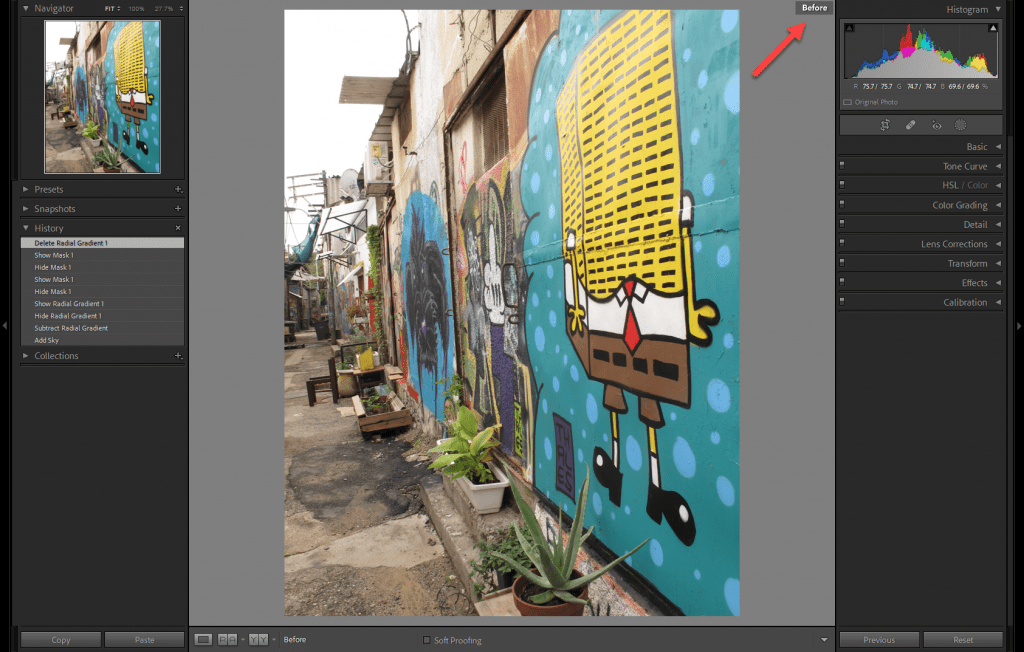
The simplest way to toggle between your Before and After views is to press backslash (\). In the menu this can be selected with View > Before / After > Before Only.
You will see the word Before displayed at the top right of your workspace and in the toolbar. This means there is no confusion about which view is on screen at any time.
Different Before/After views
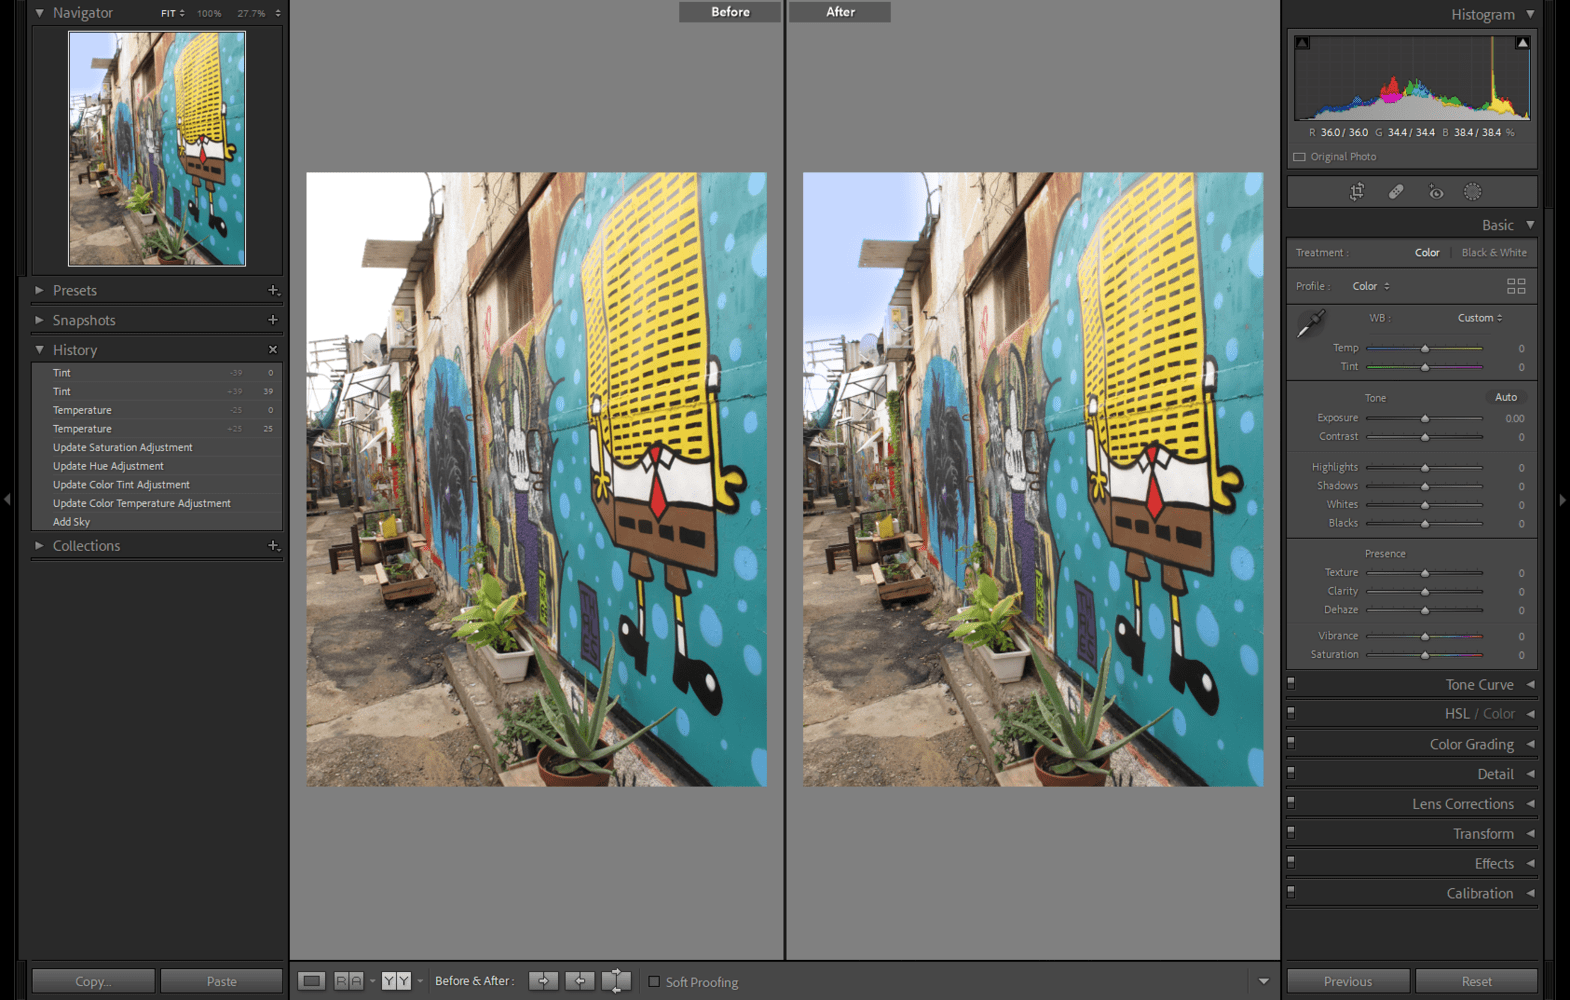
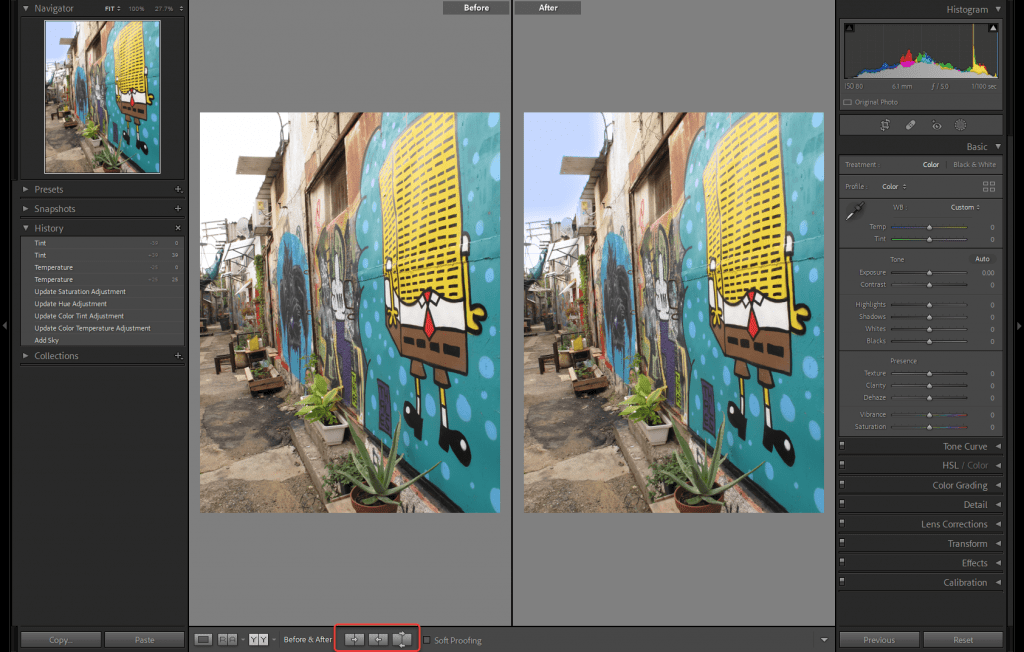
Instead of toggling back and forth, you can view both the Before and After views on screen at once.
Press Y to switch to the Before/ After Left/Right view and bring up the two versions together. The Before image appears on the left and After on the right.
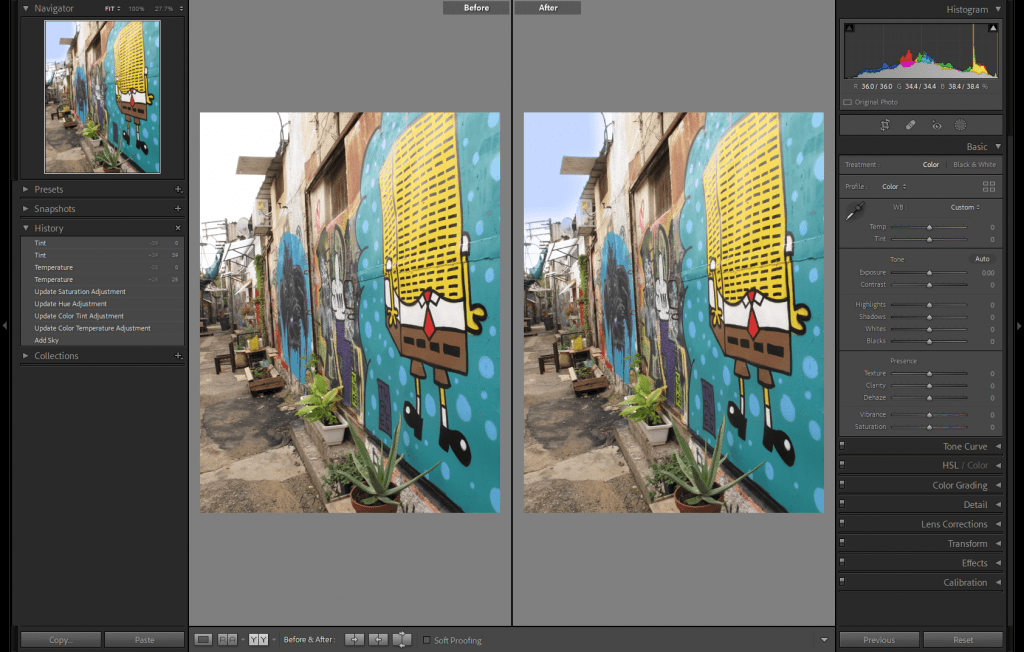
Press Y again to switch back to the single image Loupe view.
You can also access the Before/After views using the Toolbar under the main work area. The icon is a rectangle divided in two and marked with one or two Ys.
If you cannot see the Y icon, click on the small triangle at the right end of the Toolbar. Make sure that View Modes is ticked in the drop-down menu.

Click the icon to cycle through other options—Left/Right Split, Top/Bottom, and Top/Bottom Split. Or, select from the menu that pops out.
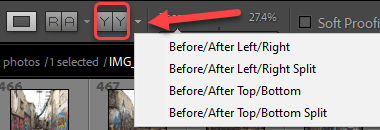
The Split options show a single image divided into half the Before view and half the After view.
How to change the Before view
Lightroom gives you the option to change the settings of your Before view.
To the right of the View Mode icons in the Toolbar, is a section labeled Before & After. There are 3 icons with arrows in rectangles.
Here you can copy your current settings from one view to the other. You can also swap the settings between the Before and After.
This can be useful when you want to create a new Before state for comparison with further edits. Next we discuss some other methods for this which give you more control.
How to use the History Panel for Before/After
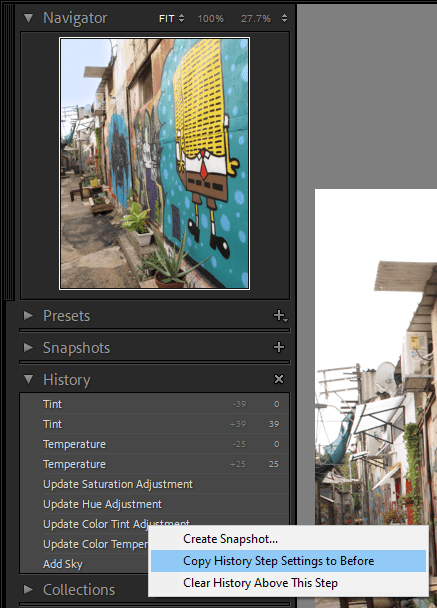
The History state lets you compare your current edits with any state in your History.
Step 1 Open the History Panel on the left side of the interface.
Step 2 Scroll through the History list until you locate the state you want to compare with.
Step 3 Right-click or Ctrl-click on the state and select ‘Copy History Step Settings to Before’.
Alternatively, you can drag the History state directly from the panel into the Before view on screen.
Now the Before view will show the image as it was at the selected History state.
How to use Snapshots to view Before/After
Snapshots let you create and view different stages in your editing process. They are in the left side panels.
Step 1 On the Snapshots Panel header click on the plus sign to create a new Snapshot of how your edits look right now.
Step 2 Change the name to something descriptive like the last adjustment you made. The default name is the date and time of the Snapshot.
Step 3 If you want, you can copy a Snapshot setting to the Before. Right-click or Ctrl-click and select ‘Copy Snapshot settings to Before’ from the pop out menu.
All the Snapshots you create will be listed in the Snapshots panel. Click the Snapshot name and it will display in the work area. If you need, use the minus button at the top to delete a Snapshot.
You can also create a Snapshot from any History state in the History Panel. Right-click or Ctrl-click on the state and select ‘Create Snapshot’ from the list.
How to use a virtual copy for Before/After
A virtual copy is another option to compare two versions of your image. It also does not take you all the way back to your imported image.
Right-click or Ctrl-click on your image or the thumbnail in the Filmstrip and select ‘Create Virtual Copy’ from the menu. It is about half way down.
You can also select it from the Photo menu. The shortcut is Ctrl + ’ (Windows), or Cmd + ’ (Mac).
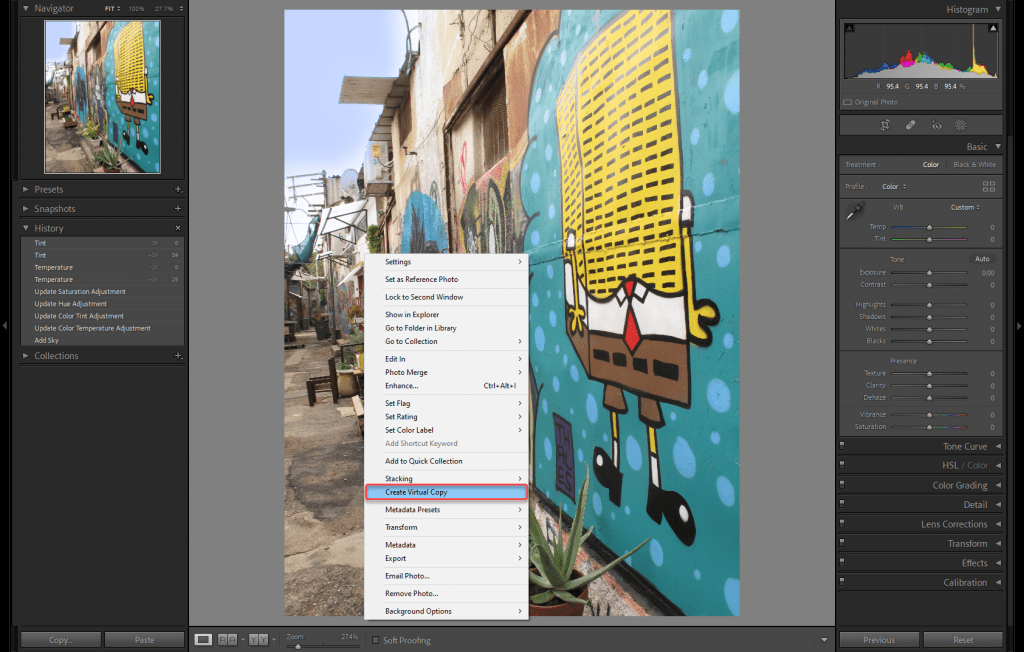
When you create a virtual copy, it sits in the Filmstrip as a new version of your image, and can be edited independently. The Before image of the copy is set to whatever it was at the moment it was created. Use this for comparison with your further edits.
A virtual copy is a handy way to try out a couple of different editing directions. Test out some color grading styles, or add some sharpening and easily compare the changes.
You can also reset the virtual copy using Ctrl + Shift + R or Cmd + Shift + R, or hit the Reset button at the bottom right. This will return it to the imported image state.
Now you can use your virtual copy as a Before view by switching from one image to the other. This option is great if you like to view in full screen mode—click F to access—where the regular Before/After functions don’t work.
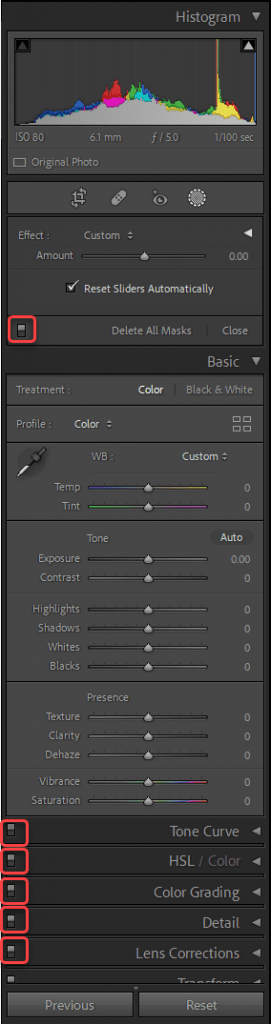
How to see Before and after of panel settings
The adjustment panels on the right in the Develop Module have a small toggle switch at the top left. This little slide button will turn on and off only the edits of that panel. The Basic Panel is an exception. The Brush tool and Mask panel also have toggles to show and hide the settings.
Use the toggle as a quick Before and After which isolates just the effects of that panel. It lets you check that the panel’s adjustments are doing the job you want.
It is also very useful for troubleshooting to find which panel’s adjustments are causing a specific change to your image.
That takes you through the options to compare your original image with your edited image in Lightroom Classic.
Don’t hesitate to use the Before and After functions as often as you need. Toggle back and forth several times to assess whether you are happy with your edits or not.
Before and After views will quickly become indispensable to your Lightroom workflow.

